A Fix for “Windows Installer has encountered a problem and needs to close”

Applies to Windows XP.

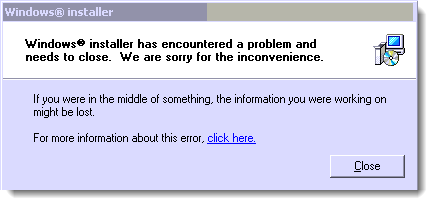
If you try to install a program, you may encounter an installer error popup that says “Windows Installer has encountered a problem and needs to close. We are sorry for the inconvenience” as shown below.

Windows Installer has encountered a problem and needs to close.

Windows Installer has encountered a problem and needs to close.

This installer error is too generic and does not include enough detail to troubleshoot or resolve the problem. We need to open the event log to find out more details of this error.

To open the event log, do the following:

  • Click Start->Run and type in eventvwr.msc, then click OK.
  • When the event viewer is open, click on “Application” to open the application log.
  • Double-click on any line with a red X that says “Application error” as shown below.
Double-click the event log "Application Error"

Double-click the event log "Application Error"

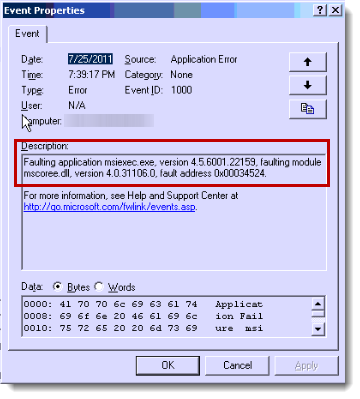
After double-clicking the “Application Error” line, the Event Properties window should open, and it should show more information on what is causing the error as shown below.
Event properties window showing more details about the error

Event properties window showing more details about the error

In this case, the error was due to module mscoree.dll causing the Windows Installer (msiexec.exe) to crash.
So it’s a .NET component that is causing the Windows Installer to fail. Now that we know what is causing the problem, we can go about fixing it.
The first thing to do is to locate the mscoree.dll file, and then check the files’ version information which can be found in the Event Properties window.

The mscoree.dll file is located in C:\Windows\System32, and its version is 4.0.31106.0.

The solution is to rename the mscoree.dll file to backup_mscoree.dll, and download an older version of mscoree.dll, then place it into the C:\Windows\System32 folder.
You can obtain  an older version of mscoree.dll from here (version 1.0.3705.0)

After you have done the above, the problem should be solved, you should be able to install programs again, at least the .NET ones (in my case it was Office 2003 that failed to install).


rtstor64.sys Blue Screen After Installing Update KB2529073

Applies to Windows 7 x64 editions.

After you install update KB2529073, your computer might crash to a blue screen after it restarts, requiring you to run System Restore to get Windows running again. The blue screen indicates that the file rtstor64.sys is responsible.

rtstor64.sys blue screen crash

rtstor64.sys blue screen crash

The rtstor64.sys file is part of Realtek’s USB drivers. The first thing you should try is to update the drivers for your external USB card reader which you can obtain from here. Download the drivers relevant to your system, restart the computer, and try to install update KB2529073. If the issue persists, then read below for a manual resolution.

Step 1

Take ownership of the rtstor64.sys file in the
 C:\Windows\System32\DriverStore\FileRepository\rtusbstor64.inf_amd64_neutral_fe0441a0db045ab6 folder.

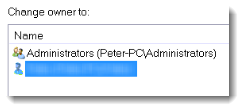
Take ownership of the rtstor64.sys file

Take ownership of the rtstor64.sys file

Step 2

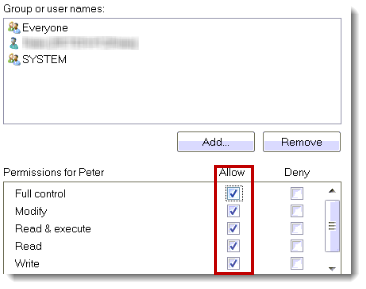
Then add full control permission for the current user to the file and folder as shown below.

Add full control permission for the current user to the rtstor64.sys file

Add full control permission for the current user to the rtstor64.sys file

Step 3

Do the exact same thing for the rtusbstor64.inf_amd64_neutral_fe0441a0db045ab6 folder.
Then rename the rtstor64.sys file to rtstor64.sys.old as shown below.

Renaming rtstor64.sys to rtstor64.sys.old

Renaming rtstor64.sys to rtstor64.sys.old

Step 4

Then install update KB2529073 again, and restart your computer, the issue should now be fixed.

Fix “The Task Image Is Corrupt” Error

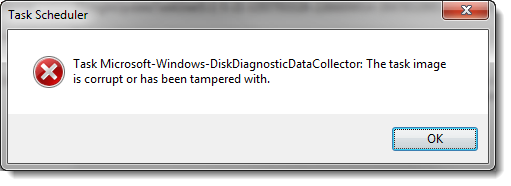
You might sometimes get a corrupt task error popup when you open the Task Scheduler. The error popup reads “Task <etc..>: The task image is corrupt or has been tampered with”.
It looks like this error will be difficult to fix, the key to fixing it is found by locating the specific task xml file in question, and deleting it.
This fixes the error, but now you will not have that task anymore which could be a problem.

The first part of this article goes into detail on how to fix the error, and the second part goes into detail on how to obtain and restore an non-corrupted version of the task in question.
Read below for the details.

Part One: Fix the Corrupt Task error.

In order to fix this, you have to delete the actual task XML  file that contains the task settings, then rerun the Task Scheduler to confirm that the error is gone.
Most of the work you have to do is to locate the task file in question.
The task files are located in C:\Windows\System32\Tasks.
If you try to open the task folder, you might get a UAC prompt asking you for permission to access the folder, this is OK, just click continue to access the folder.
In my case, the corrupt task was “Microsoft-Windows-DiskDiagnosticDataCollector“.
This was a Microsoft task, therefore I had to go into the C:\Windows\System32\Tasks\Microsoft\Windows\DiskDiagnostic folder to locate the actual task xml file,
which was named “Microsoft-Windows-DiskDiagnosticDataCollector” as shown below.

Back up and delete the corrupt task

Back up and delete the corrupt task

Once you have located the task file, close the task scheduler, back up the corrupted task file to any location of your choice, then delete it, then open the task scheduler to confirm that the error has gone.

OK, that has resolved the error, but now that task has been deleted, and it might be needed by the system or by one of your programs.
So the above steps are only a partial solution, To fix the remaining issue, see part two below.

Part Two: Import a non-corrupted version of the task into the Task Scheduler.

OK, if you have followed me this far without any problems, then you are doing well.
What you now need to do is to export the non-corrupted  task from another computer or virtual machine, and import it into the task scheduler.
To export the task in question from another computer, follow these steps.

1. Open the Task Scheduler, then drill down into the task in question, then right-click on the task and select “Export...”  as shown below.
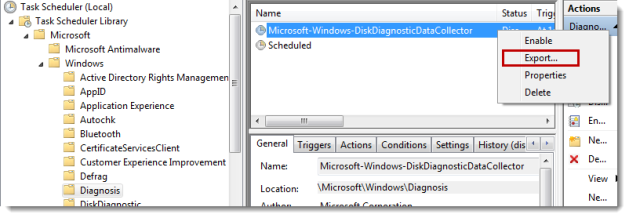
Export the task from a different computer

Export the task from a different computer

2. Save the exported XML file to a location of your choosing, then copy it over to the affected computer.
3. Once you are back on the affected computer, make sure that the task scheduler is closed, then you need to run the task scheduler as an Administrator.
4. To run the task scheduler as an Administrator, click  Start>All Programs>Accessories>System Tools, then locate “Task Scheduler“, right-click it and select “Run as Administrator” as shown below.
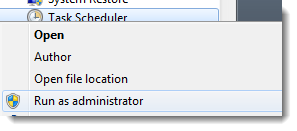
Run the task scheduler as Administrator

Run the task scheduler as Administrator

5. Once the task scheduler is open, drill down to the folder where the task is supposed to be located, right-click on a blank portion of the window, and select “Import Task…” as shown below.
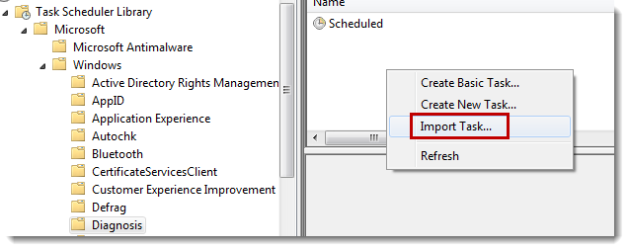
Selecting "Import task"

Selecting "Import Task"

6. Once you have imported the task, a “Create task” window will open as shown below, just click OK to it.
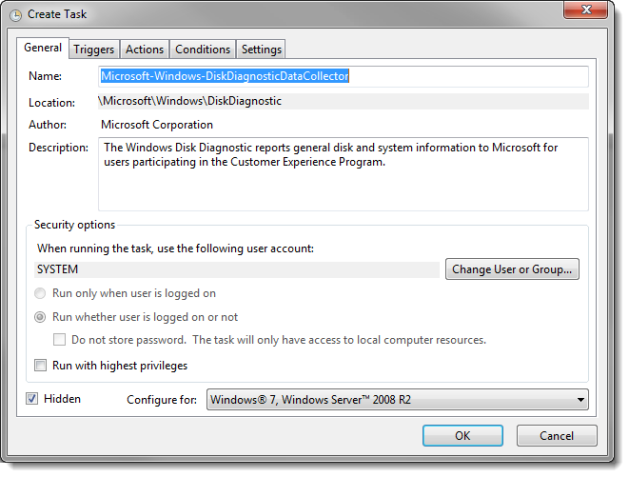
Click OK on the "Create Task" window.

Click OK on the "Create Task" window.7.

7.  The task should then be successfully imported as shown below, you can then close the task scheduler, and the problem should be fully resolved.

Successfully imported task.

Successfully imported task.

If the problem is still not resolved, or if you are having trouble finding the specific task, then leave a comment below, and I will try my best to help you fix the issue.
How to fix the 0x80070020 Windows Backup Error

If you are repeatedly seeing error 0X80070020 when running a backup in Windows 7/Vista it can really get on your nerves.
The issue is actually caused by file that is locked by other processes, when the backup encounters this file, it will fail.
Personally I think this is a weakness in Windows backup, when it encounters such files, it should just skip them and continue with the backup, which obviously it does not do.

Here I present some methods to work around this issue.

Method 1
Disable your anti-virus program, and any computer security programs that you have running, restart the computer, and make sure that the anti-virus programs or security programs remain disabled after the restart, then attempt the backup again.

Method 2
Perform a clean boot, and attempt the backup again.

To perform a clean boot, do the following:

  1. Click the Start Orb.
  2. In the Search box, type in msconfig.
  3. The msconfig utility window should now be open, on the General tab, select the circle that says “Selective Startup“, and uncheck the box that says “Load startup items
  4. Go to the Services tab, and check the box that says “Hide all Microsoft services“.
  5. Click the “Disable All” button.
  6. Click OK to all prompts and restart your computer.
  7. Attempt a backup again.
  8. To revert the msconfig changes, run msconfig again as in point 1, but on the Startup tab, select the “Normal startup” circle, and restart your computer.
Method 3
Create a selective backup to exclude the AppData folder, and attempt the backup again.
To create a selective backup, do the following:
1. Click the Start orb, and in the search box, type backup and press ENTER.
2. When the backup window opens, click on “Set up backup” as shown below.
3. Wait for the backup program to initialize, select the disk where you want to create the backup on, and click Next as shown below.
Select the backup location

Select the backup location

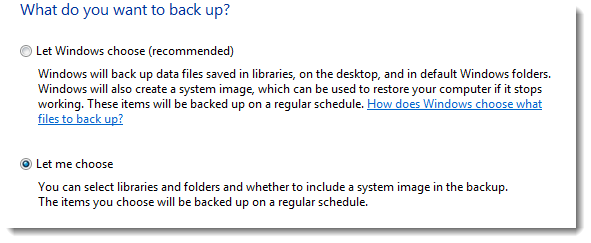
4. On the next screen, where it asks you what you want to backup, select the “Let me choose” circle, then click Next.
Choose the "Let me choose" circle.

Choose the "Let me choose" circle.

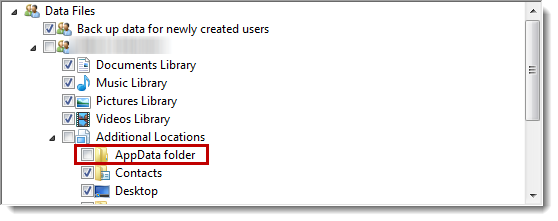
5. On the next screen, click the down arrows below the “Data Files” icon, and drill down to the (your username)>Additional Locations>AppData folder, and make sure to uncheck the box next to AppData folder as shown below, then click the Next button.
Uncheck the box next to AppData folder

Uncheck the box next to AppData folder

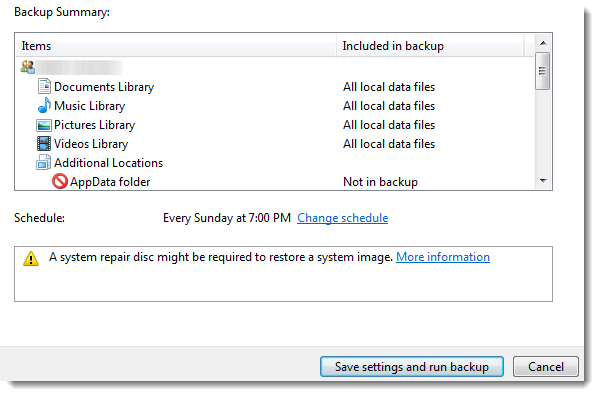
6. On the next screen, click the “Save settings and run backup” window to run the backup as shown below.
Click the Save settings and run backup button to start the backup

Click the Save settings and run backup button to start the backup

The problem should now be resolved.
If you have tried all the methods above, but you are still having the same problem, then please contact me at techman@windowslive.com
I have fixed this issue in the past, so I may be able to help you with it. If you do manage to resolve this issue, please drop me a line with the method that you used to fix it.

How To Fix Non-Genuine Microsoft Security Essentials

If you are having problems validating Microsoft Security Essentials, then please read the steps below to resolve this issue.

This issue can occur due to an incorrect permissions setting on certain files used by Security Essentials. It could also be caused by a malware infection that uses this method to disable Security Essentials.

Here are a few solutions to try to resolve this particular issue.

Solution 1
Scan your system with alternative anti-rootkit, and anti-malware utilities to eliminate the possibility of malware causing this issue. If malware is found, clear it off with the utilities below and try to re-validate your copy of Security Essentials.

Here are some links for anti-rootkit, and anti-malware utilities.

Anti-Rootkit Utilities:

Dr Web CureIt:
http://www.freedrweb.com/cureit/?lng=en
Kaspersky TDSSKiller:
http://support.kaspersky.com/viruses/solutions?qid=208280684
Norton Power Eraser:
http://security.symantec.com/nbrt/npe.aspx?lcid=1033
Hitman Pro 3.5:
http://www.surfright.nl/en/downloads/downloads
Sophos Anti-Rootkit:
http://www.sophos.com/products/free-tools/sophos-anti-rootkit.html

Anti-Virus Programs:

Microsoft Safety Scanner (online scan):
http://www.microsoft.com/security/scanner/en-us/default.aspx
ESET Online Scanner:
http://www.eset.com/us/online-scanner
MalwareBytes:
http://www.malwarebytes.org/
SuperAntiSpyware free:
http://www.superantispyware.com/downloadfile.html?productid=SUPERANTISPYWAREFREE

After you have scanned and removed malware from your system with the above utilities, re-validate your copy of Windows from the following link 

Solution 2
(Windows XP only) Add permissions to the Windows Genuine Advantage Data.dat file:

Preliminaries:

Firstly you need to unhide hidden files and folders, and restart your computer into safe mode with networking if you are running Windows XP home, or if you cannot see the security tab. To do this, please do the following:

    • For Windows XP home users, or if you are unable to see the security tab, restart your computer, but before you see the Windows logo on startup, press the F8 key to go to the advanced options menu, then select the “Safe Mode With Networking” option, and log into your Windows account, please note that your account should be an administrator account, and not a standard user account, then proceed with the steps below.
    • Click Start->My Computer.
    • Click Tools->Folder and Search Options.
    • Click the View tab and select the circle that says “Show hidden files and folders”.
    • Uncheck the box that says “Hide extensions for known file types”.
    • Click OK to all windows.

Actual Steps:

  1. Navigate to the  C:\Documents and Settings\All Users\Application Data\Windows Genuine Advantage\data folder.
  2. Right-click on the data.dat file, and click Properties.
  3. Click the Security Tab, and verify that the Everyone group is listed, and that it has Read & Execute permission.
  4. If the Everyone group is not listed, then click on the Add button.
  5. Type in Everyone in the text box and click OK to all the windows.
  6. Restart the computer in Normal mode (just restart, no need to change anything).
  7. Re-validate your copy of Windows from the following link
  8. Try to re-validate Security Essentials.
  9. To hide the unhidden files and folders, and file extensions, follow the steps in point one again, but select the circle that says “don’t show hidden files and folders”, and check the box for “Hide extensions for known file types”.

Solution 3
(Windows XP only) Delete the Windows Genuine Advantage data.dat file by doing the following:

Preliminaries:

Firstly you need to unhide hidden files and folders. To do this, please do the following:

    • Click Start->My Computer.
    • Click Tools->Folder and Search Options.
    • Click the View tab and select the circle that says “Show hidden files and folders”.
    • Uncheck the box that says “Hide extensions for known file types”.
    • Click OK to all windows.

Actual Steps:

  1. Navigate to the  C:\Documents and Settings\All Users\Application Data\Windows Genuine Advantage\data folder.
  2. Delete the data.dat file inside the data folder.
  3. Re-validate your copy of Windows from the following link
  4. Click Start->Run, and type in the run box wgatray.exe /b, then click OK.
  5. Restart the computer.
  6. Try to re-validate Security Essentials.
  7. To hide the unhidden files and folders, and file extensions, follow the steps in point one again, but select the circle that says “don’t show hidden files and folders”, and check the box for “Hide extensions for known file types”.
Solution 4
Run the Windows Genuine Advantage Diagnostics tool, this should update the data.dat file. To run the tool, please do the following.
  1. Download the tool from here
  2. Run the downloaded file, and when its window opens, click on the Continue button, and wait for the program to complete.
  3. You should then be brought to the tools Windows tab, click on the Resolve button, and wait for the program to complete.
  4. Restart the computer.
  5. Try to re-validate Security Essentials.
Solution 5

Perform a thorough uninstall of Security Essentials, and then re-install it.

  1. Download and install a program called Revo Uninstaller from this link.
  2. Once Revo is installed and open, locate Microsoft Security Essentials in the Revo window, you may want to click on View->List if you have alot of programs and are having trouble locating it.
  3. Once Security Essentials is found, double-click on it, and click “Yes” to begin the uninstall procedure.
  4. In the “Select an uninstall mode” window, select the “Advanced” option and click “next”.
  5. The uninstallation will now proceed, and might take some time, if you get a popup asking to uninstall the product, click “Yes”.
  6. The window should then go back to the “performing initial analysis and uninstall” window, click “Next”.
  7. There will now be a scan for leftover information, when it’s finished, click on the “Select All” button, and then click “Delete”, then click “Yes” to the prompt.
  8. Click the “Next” button, and then click “Finish”.
  9. Download and install Security Essentials from here.
  10. Restart the computer and verify if Security Essentials is now validated.
If all of the above steps have not helped to resolve this issue for you, then you can contact me at techman@windowslive.com for further assistance.
I have managed to resolve this issue in the past by using more in-depth analysis, so I might be able to help you with this issue.

How To Fix the DllRegisterServer 0x80020009 Error

Problem:

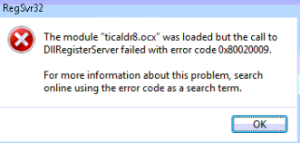
When you try to register a dll with regsvr32.exe in the command prompt or Run box, you get an 0X80020009 error popup as in the example image below.

Regsvr32.exe Error

Regsvr32.exe Error

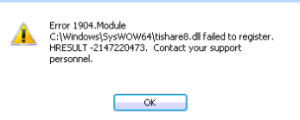
In addition to that, when you try to install a program you get a 1904 error that a certain dll was not registered as show in the example image below.

Error 1904

Error 1904

Why this issue occurs:

This error can occur because you have insufficient rights to register dll files, or it could be caused by a system-wide permissions issue.

What you can do to fix this issue:

Solution 1

Run the regsvr32.exe command with administrative rights (For Vista/Windows 7 users):
To do this, click Start>All Programs>Accessories, then right-click on “Command Prompt” and select “Run as Administrator”.
Then type regsvr32.exe  some.dll (replace some.dll with the dll in question).

Solution 2

Restore your computer to an earlier time using System Restore:

For Windows XP/Windows Vista/Windows 7 users:

  1. Click Start>All Programs>Accessories>System Tools>System Restore
  2. When the System Restore wizard opens, follow the prompts, and choose a restore point to a date before the issue started happening. You may need to click on the checkbox that says “Show more restore points”.
  3. Follow the prompts to initiate System Restore, and let the computer restart.
  4. Try to register a dll again.

Solution 3

Restore file and registry security permissions to a known state.

For Windows XP users:
  1. Download and unzip restore_perms.zip
  2. Locate the unzipped folder, and double-click the !RUNME file.
  3. The command prompt window will now open and will begin to restore the file and registry permissions to a known state, please be patient as the command can take some time to complete.
  4. Once the command has completed, try to register a dll file again.

For Windows Vista/Windows 7 users:

  1. Click Start>All Programs>Accessories, then right-click on “Command Prompt” and select “Run as Administrator”
  2. Type in the following command exactly as you see it and press ENTER.
    secedit /configure /cfg %windir%\inf\defltbase.inf /db defltbase.sdb /verbose
  3. Wait for the command to complete, it can take some time so please be patient.
  4. Once the command has completed, try to register a dll file again.
If the issue is not solved after trying the above solutions, then the issue needs to be looked at in more depth. Please see this page for further assistance

Logitech Webcam Not Recording

Problem

Your Logitech webcam is not recording video, it plays video just fine, but when you press the “Record” button it just endlessly initializes but never starts recording.

Why this issue occurs:

This issue can occur for many reasons, ranging from outdated or corrupt Logitech software,
and outdated video drivers, to inconsistent file and registry permissions.

What you can do to fix this issue:

Solution 1

Download and install the latest Logitech software and drivers for your webcam from:
http://www.logitech.com/en-us/support-downloads

Solution 2

Update your graphics drivers, odds are you have either an Nvidia, ATI, or Intel graphics card installed inside your computer case.
You can download and install the latest drivers for your graphics card from these locations:

For Nvidia owners:
http://www.nvidia.com/Download/index.aspx?lang=en-us
For ATI owners:
http://support.amd.com/us/gpudownload/Pages/index.aspx
(note that AMD now owns ATI) .
For Intel owners:
http://downloadcenter.intel.com/

Solution 3

Update your sound card drivers:

For Creative Labs Soundblaster owners:
http://support.creative.com/Products/Products.aspx?catid=1
For Intel sound card owners:
http://downloadcenter.intel.com/

Solution 4

Run the following Microsoft Fixit utilities to diagnose and repair video, audio, and hardware device issues as shown below.

Playing video files crashes or freezes Internet Explorer or Windows:
http://support.microsoft.com/mats/video_freezes_or_crashes/

Hardware devices are not working or are not detected in Windows:
http://support.microsoft.com/mats/hardware_device_problems/

Diagnose and repair sound recording problems automatically:
http://support.microsoft.com/mats/AudioRecording/

Diagnose and repair sound playback problems automatically:
http://support.microsoft.com/mats/AudioPlayback/

If you have followed all of the above steps, and you still have no joy, then this issue should be looked at in more depth, please see my “Remote Assistance” page for further advice.

[Resolved] Logitech Webcam not Recording Video

Summary

  • Platform: Windows 7 Ultimate 64 bit, SP1.
  • Problem: Logitech HD Pro Webcam C910 would not record video.
  • Resolution: Added full control permission permission for the Users group to the HKLM\Software\Microsoft\Windows\CurrentVersion\MMDevices\Audio\Capture\{9d737ac2-6ccd-443d-b073-b0349007edfc}\Properties registry key.

Full Solution

This is an interesting case involving a Logitech HD Pro Webcam C910 that would not record video.
It would play live video just fine, but upon pressing the Record button on the Logitech user interface, it would just endlessly initialize, and count 3..2..1 as if it was going to record something. Upon looking inside the folder where the video’s were recorded, there were multiple video files, but they all had a zero byte file size.
Multiple video files with a zero byte size.

A download and re-installation of the latest Logitech software for this particular camera model did not resolve the issue either. There were no events for this issue recorded in the event viewer, no application was crashing, therefore I turned to the excellent Process Explorer and Process Monitor tools which I so often use.

I first turned to Process Explorer to see what Logitech processes and services were running when video was supposed to be recording, unfortunately there were multiple Logitech processes and services running, making the task quite difficult to narrow down to the specific process or service that was responsible for recording the actual video.

Multiple Logitech processes.
Logitech Vid HD process.
A Logitech usermode service.
Logitech Camera Control Interface
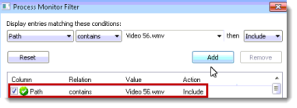
So I turned to Process Monitor, and I had the idea of setting a filter on the next video name that would be created when I pressed the Record button, in this case, the next video name would be Video 56.wmv(the video files are named sequentially each time you record one).

Setting a Process Monitor filter to include only Video 56.wmv.

After setting the filter, I started capturing events with Process Monitor, and I pressed the video record button, and Process Monitor duly started recording events. I then established that the Launcher_Main.exe Logitech process was responsible for recording the actual video.

Launcher_Main.exe creating Video 56.wmv
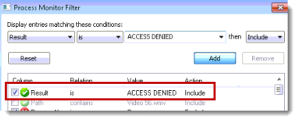
There were 326 events when I stopped capturing them, but unfortunately they were all showing a result of SUCCESS, there was nothing that stood out in the events. So I thought since the video file is created, but it is zero bytes in size, maybe something is blocking the file from being filled with data, could it be a permissions issue? So I disabled the “Video 56.wmv” filter and created a filter for the result of ACCESS DENIED as shown below.
Setting a Process Monitor filter to include a result of ACCESS DENIED
This time, there were only six events in process monitor showing that the svchost process was trying to set a value to the
HKLM\Software\Microsoft\Windows\CurrentVersion\MMDevices\Audio\Capture\{9d737ac2-6ccd-443d-b073-b0349007edfc}\Properties registry key.
I didn’t check the actual service being hosted by svchost.exe that was trying to set the registry value as I figured I had enough information to continue forward.
Six ACCESS DENIED events showing up in Process Monitor
I opened that particular key in Regedit, and it was a key associated with the Logitech audio capture settings.
Adding Full Control Permission.
I then checked the permissions on that key, and I saw that the Users group only had Read access to that particular subkey. I added Full Control permissions for the Users group to that subkey.

Then I attempted to record a video again, and this time the video started to record properly, there was no more 3..2..1 endless countdown, and the videos’s were not zero bytes in size anymore, this was further confirmed by the fact that the recorded video played in Windows Media Player without problems.
So it appeared that the video file was not recorded because the sound could not be recorded due to a permissions problem in setting a value on a specific registry key. Another case solved!

Video files now recording normally.

DVD/CD Error Code 39

Problem

You cannot play or burn DVD’s or CD’s, and in the device manager, your DVD/CD is disabled, showing error code 39.

Solution

  1. Go to http://support.microsoft.com/mats/cd_dvd_drive_problems/en-us
  2. Click on the Run Now button on the page, run the downloaded file and click Yes to all the prompts. (choose the “Recommended” option).
  3. Try to play or burn a DVD or CD again.

Realplayer MSVCP90.dll Missing

Problem

Attempting to run the latest version of Realplayer produces an error popup that says MSVCP90.dll is not found.

Solution

  1. Download and install Realplayer 11 Gold (an older Realplayer) from here: http://dl.commentcamarche.net/en.kioskea.net/download/files/RealPlayer11GOLD.exe
  2. Download and install the latest Realplayer from here: http://uk.real.com/realplayer/
  3. Run Realplayer and the error should not reoccur.